Showing posts with label guide. Show all posts

Monday 20 April 2015

A Guide to Writing the BEST Blurb for your Book!

So you've written your book, you've got the perfect illustrations to accompany it and your front cover screams 'read me!'... are you ready for your blurb?


What is a 'blurb'?

A blurb is the text on the back of your book which describes what your book is about.   The dictionary says;

blurb

 (blɜːb
n
1. promotional description, as found on the jackets of books


Why is it important?

Think of it as your sales pitch - that one chance to describe your story to potential readers and hook them in. A lot of authors write their blurb as an afterthought - something that sums up the end of their project when really, you should be thinking about this before you've even finished writing your story! Your blurb will be the text on which the rest of your book is judged - rush it or half heartedly write it and the customer may think your story will be the same. 

Every word in your blurb should work towards selling your idea, your story, your characters - and make it the reader want to find out more! Why should they buy it? Why this book? Your blurb should be THE BEST blurb you could possibly write for this book, anything less will not do.

What should it contain?

There are no set rules for what your blurb should and shouldn't contain, but in my many years of working with children's books I've read a lot of them - good and bad. Here's some pointers to get you started.

What kind of book have you written? A kids picture book? A horror novel? Make sure it's clear what kind of book your reader can expect!

What words describe your book and fit well with it's theme? Fast? Passionate? Quirky? Awkward? Sad? These are the words you should try to use. Try to only use powerful words and avoid cluttering up sentences with pointless, long descriptions.

Who is reading your book? If your book is aimed at high school girls, then you probably don't want to talk to them in the same way you would a 54 year old mechanic. Use appropriate language for your target audience.

Keep it SHORT!
I can't stress this one enough - you have a very limited window to sell your book here, someone has picked it up and is actually reading the back of it! Don't bore them or scare them away with an essay. keep it short, sweet, to-the-point and make every word an important, powerful word.


Do...
-Introduce your main character
-Explain the situation and main conflict without revealing the ending
-Keep it short, but powerful
-Write, and re-write until your blurb is perfect
-Use powerful words that reflect the theme of your book
-Write in the present tense
-Use a short extract from your book if it is action filled and catchy
Don't...
-Use lots of words to over describe
-Clutter the blurb with too many characters or events
-Mention other books or authors
-Blow your own trumpet - let the reader be the judge of that!


Your blurb should sound nice. (Sound nice?) Yes! A little bit like a poetic verse, your blurb wants to roll of the tongue, be easy to read and flow like a lover serenading. I've  included below some examples of blurbs from popular, famous books that you have most likely read. Let's see if you can guess which book they are from!*


Harry Potter thinks he is an ordinary boy - until he is 
rescued by a beetle-eyed giant of a man, enrols at Hogwarts School of Witchcraft and Wizardry, learns to play Quidditch and does battle in a deadly duel. The reason: HARRY POTTER IS A WIZARD!


Streetwise George and his big, childlike friend Lennie are drifters, searching for work in the fields and valleys of California. They have nothing except the clothes on their back, and a hope that one day they'll find a place of their own and live the American dream. But dreams come at a price. Gentle giant Lennie doesn't know his own strength, and when they find work at a ranch he gets into trouble with the boss's daughter-in-law. Trouble so bad that even his protector George may not be able to save him...


When Alice follows the White Rabbit down the rabbit-hole, she finds herself in a wonderland of amazing characters where anything can happen. There is a Mad Hatter, a March Hare and a sleepy Dormouse who hold a never-ending tea-party; a Cheshire-cat who appears and disappears at will; a sad Mock Turtle who enjoys dancing with a Gryphon; a Caterpillar who gives invaluable advice on how to shrink and grow and a Queen of Hearts whose constant command is 'Off with their heads!'


Think about your font...

It may not be the first thing you think of, but the font of your blurb is important too. Overall, it must be readable, but you want the font to relate to the book and accompany the theme. Don't settle for Times New Roman because it was the default font - explore and experiment to see what fits best! 

Print out your blurb at the size it will be read. Does it look good? Can you read it? Does it sit on the back cover nicely? Could it be better?

There are plenty of fonts available on the net and a lot of them are free! Just make sure you are allowed to use them for commercial use.

Should I pay someone to write a good blurb for me?

I've seen several publishers offering a relatively cheap service to write a 'professional' blurb. While I can't say I have ever used this service, I can see why it is appealing. Ask yourself - have you tried writing your own before giving up? Has the person writing your blurb actually read your story? Do they have the same connection you have to your characters and the events that shape their lives?

I'd be interested to hear if you did pay for a blurb and the outcome was successful - please get in touch in the comments below!


I hope that helped you write your blurb, or at least got you thinking about what it should contain. Good luck with your book!

In the meantime, if you have a project you need illustrating, you can email me at izzybean@izzybean.co.uk

You can see my online portfolio on my website at www.izzybean.co.uk 

Izzy Bean


*The answers to the famous blurbs...

Harry Potter and the Philosophers Stone
Of Mice and Men
Alice's Adventures in Wonderland

Did you guess correctly? Let us know in the comments!


Sunday 24 November 2013

Izzy Bean's guide to self publishing your ebook - a breakdown!

I know it's been a while since I lasted made a blog post. I'm busy illustrating for some really great projects that I'll share with you all soon! In the meantime, I thought it might be handy to write a little bit about ebook publishing.

I know there's a lot to get your head around if you're new to ebooks and what everything means. In the last few years I'd say 80% of the books I illustrate are ebook only. We'll not get into why this is right now, but safe to say if you're thinking about writing or have written a book - you've thought about ebooks.

It's not as complicated as it first looks. And if you have a bit of know-how, you can do it on a very tight budget too. So what options do you have?

Well, you've written your script, you've commissioned an illustrator to provide some amazing illustrations ( Or are you looking for one? ) and you're ready to go! But where on earth do you start? Who is the cheapest? Who offers the most revenue from sales? Who takes the biggest cut? 

There are some big names out there in the self publishing world, and I've worked with most of them. Let's break down and compare the market leaders to see exactly what your options are.

Amazon Kindle Direct Publishing

One of the big-hitters, Amazon offer their very own publishing platform called Amazon Kindle Direct Publishing, or KDP for short.

Of course, the first thing to remember is Amazon have the power of the KINDLE - their own ebook reader which is highly popular and dominates the market. Publishing with Amazon will mean all those Kindle readers have access to your book - and that's a lot of people... 


- Amazon's ebook format is AZW, or .mobi - you'll have to convert your book into this format or pay someone else to do it. If you're looking to do this yourself, checkout Calibre or Mobi-pocket Creator

- Amazon offer a 70% royalty rate, with some rules which are listed on their website.

- The Kindle App is available on almost all devices, phones, PCs, Macs and Android. Even if your fans don't have a Kindle, they can still read Kindle books on other devices too.

- Amazon offers KDP select; a feature that, if eligible, can give you access to promotional tools whilst making your book part of the Kindle Owner lending library. In short, an annual fund will mean you get some of that money, but people can view your book for free for a limited time - getting you more reviews and fans. This also means you'll be exclusive to Kindle and so can't upload your book anywhere else.

- It's worth noting too, that some of the Kindles don't have full colour screens - so if you have beautiful illustrations make sure they look good in greyscale too!

iBooks author

ibooks author, if you didn't already guess is Apple's publishing software.

Books from the iBookstore are only readable on Apple's devices such as the iPad, iPhone, etc. However considering how many people own some sort of Apple device, this isn't a low number. 

- The ibooks author software is free to download and use, and comes with pre-made templates to make it easier to create your ebook (you can also use templates made by 3rd parties...)

- ibooks author offers the opportunity to do more with your ebook, such as make it interactive or add a soundtrack

- 70% royalty rate the same as Amazon

- Retain 100% of the rights to your ebook, but you have to 'register' and fill out an application which can take some time


Smashwords

Smashwords is an ebook distributor that lets you distribute your books to the largest ebook retailers.


- Smashwords is fast, free and easy. They take small royalties (you earn 85% of the net profit) but don't charge you for their service unless you sign up for their 'premium' service

- You can use their 'meat grinder' tool to do all the hard work for you, simply upload your word file and get your ebook in many different formats!

- You can sell on Smashwords itself as well as exporting to other sites, and Smashwords will take care of the distribution for you

Barnes & Noble Pub-it

Pub-it is Barnes & Noble's publishing service. Barnes and Noble are the creators of the Nook - a popular ebook reader. 


- Pub It offers a free conversion tool

- Work on a % without any upfront fees and get paid monthly rather than the 60 days Smashwords offer

- Your book will not only be available on the Nook, but also on the Barnes & Noble website - a very popular and well respected bookstore


Lulu

Lulu is a web-based self publishing service, 
which also boasts an online community including forums. 
Lulu, like other companies I've mentioned above, offer to publish and distribute your book 
for no charge - instead taking a percentage of royalties.


- Lulu has a store which gives you the option to order paperback printed copies of your book as well as the ebook version, although the high price of doing this to order means you likely won't sell many

- You will get 80% of the net profit and get paid monthly through Paypal

- Keep the copyright to all your work

- You can get a Lulu ISBN number for free - some of the above companies require you to buy this (ibooks)

- Can be listed on Amazon, although it does take some time for this to be processed

Createspace

Createspace, created by Amazon, is very similar to Lulu - but seemingly a lot cheaper. Not only do they offer book service but also CDs and DVDs too. They have both free and paid services. 


- Free to create and distribute your ebook, you only pay a % when you start seeing sales

- Can create paperback printed copies at a lower price than Lulu.com - you can proofs sent at a low price too

- Create Kindle ebooks

- Fast and easy to work with, but limited on choices of covers and spine art. You'd probably be best spending the money you've saved using Createspace in hiring a decent artist or designer to make your book stand out.

So, which one fits your requirements?

Only you can make that choice, but I hope this little guide helped somewhat to breaking down each companies' pros and cons in an easy to understand way.

There are, of course, other options out there. However I've listed the most popular and well known companies. 

Please leave a comment, share, like or follow me if you like what you've read!

You can visit my website, at www.izzybean.co.uk

Or my Facebook page! www.facebook.com/izzybeanart


Friday 25 October 2013

Step by Step HALLOWEEN DRACULA VAMPIRE MONSTER! With Free colouring sheet for kids!

I've been posting these halloween guides all week, and today it's the turn of DRACULA!

All you need is a pen and paper - or a computer and mouse. It's not too difficult and it's easy to personalise if you want to be creative too!

And there's a FREE downloadable colouring sheet for kids at the bottom of this post!

DRAWING DRACULA - STEP BY STEP GUIDE

To start with, make a shape like this;

And another one, exactly opposite. They want to be as near symmetrical as possible, and the same size!

Then, draw this strange shape. This is the most difficult part, I promise!


And as before, draw it's mirror image opposite. All these shapes should connect and create one shape - the face!


Next, add this line and curve as above. Try to end it about 1/5th of the way down from the top, and in the centre of the face.


Do the same on the other side, making sure they meet in the middle!


Now we'll be adding ears. You can draw any shape ears you like, pointy ones work very well for Dracula. It's good to keep them symmetrical.


His nose, again, can be customised to create your own look, but pointy, long and thin are always a winner.


Next, we add the eyebrows. Have them meet in the middle, but not touching - you can leave a little gap. Arch them high in the middle for that menacing, evil effect!


At either side of the nose, draw small curves like this...


... then connect them with a menacing smile!


Add a little curve under that smile to give him a bottom lip!


Next, draw a long line downwards from the chin, and flick it outwards at the end.


Do the same on the other side too


Then, find where the very bottom of the nose is, and starting from the cheek besides it, draw a long curve, stopping at about the same length as his chin.


From this curve, draw another curve (not quite so curvy!) inwards, but stop before you get to his neck!

Apply the same to the other side, and you're nearly there!


Add two little beady eyes underneath those eyebrows you drew earlier. 


Now we can add some details to the inside of the ears... but wait! 
We're forgetting the most important bit!!


The fangs! Draw these nice and big, with sharp points on the end! 
He wouldn't be Dracula without them.


And there you have it! A sinister vampire cartoon of your very own!

Add some colour and share him with the world! Or me... at izzybeanillustrations@gmail.com


And as promised, here is a downloadable colouring in sheet for the kids, little and big! Just right click on this massive image below, 'SAVE AS' then print onto A4 paper.

See you next time!


Tuesday 22 October 2013

Step by Step HALLOWEEN FRANKENSTEIN MONSTER! With Free colouring sheet for kids!

Yesterday I posted a step by step guide to drawing your very own halloween bat, today, it's Frankenstein's monster!

If you missed the bat, you can find that here.

All you need is a pen and paper - or a computer and mouse. It's not too difficult and it's easy to personalise if you want to be creative too!

And for a FREE colouring sheet, scroll to the bottom of this post! (If you can afford to miss the drawing guide!)

DRAWING A FRANKENSTEIN'S MONSTER - STEP BY STEP GUIDE

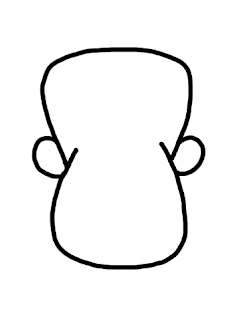
We begin with this shape;

It's not exactly a curve, nor is it square; but somewhere in-between. 

Next, the same shape, but upside down!

Make sure they're touching and the bottom one fits into the top.


At the point where these shapes cross, draw some bent circles peeking out. These will be the ears - so if you want big ears, make them bigger! I went for little ears.


Next add two lines coming from the very bottom of those ears. The lines should not be straight down, but widen outwards.


In the dead-center, between the ears, add a nose! I drew two small dots, then a circle connecting them. Leave out the bottom of the circle.

To add a chin, draw a semi-circle over the bottom of the face. You should erase the bottom of the face so that it looks like the picture above.

Now draw a ( bracket shape on the left of the face, and a ) bracket shape on the right.

Connect these brackets with a curve - and you have a smile!

An extra, smaller curve under the smile gives him a bottom lip.


Now for the hair - here you can use your imagination and make it as long, curly, spiky or wavy as you like!

We want an L shape on it's side to make the monster's spooky forehead


And the opposite on the other side - it's good to keep faces symmetrical!


Above each L shape you just drew, draw some eyebrows - these are slightly arched


Let's get up close and add some eyes! Two little dots right above the nostrils look great - but you can play around with placement and see what looks best!


We're getting close! But there are still some important things to add yet!

Draw a small 3 in the left ear (your left, not his!) and a E in the right ear.


Halfway down his neck, underneath his ears, draw a small rectangle like this...


... and then join that to the neck with two lines like this!


Once you do that on both sides... ta daa! Your monster is complete! Mary Shelley would be proud!

Add some colour, and share your creation with the world!


Thanks for reading, don't forget to watch this blog for more halloween how-tos all this week until the 31st!

As promised, below is the FREE colouring sheet for any little monsters who like to get messy this halloween. Simply right click the huge picture and 'SAVE AS' on your computer, then print the picture onto A4 paper!

And if you would like to share your monster, just email a picture to izzybeanillustrations@gmail.com

See you next time!