Saturday 16 March 2013

Tutorial 01: How to draw a vector using Adobe Illustrator

Hello everyone!

This post will be the first of many tutorials on my blog. I've been asked many times how I draw in vector, and so I thought that would be a good place to start. Vector drawing might not be the easiest, but this is a very popular style of illustration that can be used in a wide range of applications.

Before I begin, I must state that this tutorial is designed to be a simple, step by step process that anyone can follow. Adobe Illustrator is a fantastic program that is capable of so much, but we'll just keep basic for the sake of this guide. If you don't understand anything, then I do apologise! Just ask me for a better explanation.

You can, of course use other vector programs, but this tutorial is specifically about AI 

Tools you will need;

Pencil and paper (unless you sketch digitally!)
Scanner (unless you sketch digitally!)
Computer
Adobe illustrator


Sketching your idea

Whatever your drawing abilities, this bit should be fun! Don't worry too much and just relax. I rarely use paper and pencils anymore for vector work and choose to draw digitally using a graphics tablet - but either method works fine.

Unless you're an AI pro, keep your drawing fairly simple. You can always build on it later if you want to play with the program some more.

The images that work best as vector make most of the block colour or 'cell shading' effect. So more realistic or painterly illustrations would be best in a different program.


Importing your sketch into Adobe illustrator

Once you have your sketch you need to open it in Illustrator. If you've used the traditional method of pencil and paper, you need to scan in your illustration using a scanner. This should leave a jpeg of your sketch somewhere on your computer. Try to keep it A4 size or less.

First of all, open Adobe Illustrator. If you go direct to the Adobe website you can download a free 30 day trial which lets you use the full program.

Once opened, it should look something like this, but with your backdrop instead of mine;


If you're using older versions of Illustrator they may vary but the general layout and tools are the same. 

From here, you should select File which is located at the left of the menu bar at the top. 

You will see this drop down menu appear;


Select New to make a new file. A window will appear which gives you many options.


You can name your new document here, for example 'Bear' or 'Test 1' or whatever you fancy.

Where it says 'profile' - you have a few drop down options. To keep it simple we'll select 'print.' Which basically means the program will select the best output for an image that is to be printed.

Leave the number of art boards at 1 for now.

You can set the size to whatever you desire, but for the sake of this tutorial we'll use a bog standard A4 size. 
To do this select A4 from the drop down menu where it currently says [custom] - the rest of the numbers will be filled automatically and you can click on OK to begin with these specifications.

After clicking OK your document will open with a blank A4 page.


You can think of this as your virtual piece of paper. In AI this is called your art board.

What we want to do is get your sketch onto this art board, and to do this, navigate to File which you used earlier - at the top left. This time scroll all the way down to Place... and click on it.


A window will pop up which shows you your computer files.


Depending on what kind of computer and programs you use you'll see some variation of the above. You should navigate to your sketch wherever it is located on your computer and select it. When you do, click on Place at the bottom right of the window.

Your sketch should now appear on your art board. Hopefully it sits in the middle and covers a decent portion of the A4 paper. If not, you can easily change the size by clicking on the sketch, then one of the corners of the box that contains it and dragging it. To keep the correct  proportions hold down the shift key while dragging it to your preferred size.

Hang on we aren't quite ready yet! There are a couple things you need to do before starting to make your vector. 

At the right of your screen there should be a selection of tools and words and pictures. It should look a little like this - 


If you don't see something like this, go to the menu bar at the top again, this time click on Window and then Layers from the drop down options. It should now appear. You can do this at any time to bring up any tools you can't find. (And take away ones you don't want.)

Here we need to change your sketch's opacity. We do this because if you try drawing over your sketch while it is at 100% opacity, you can't clearly see what you are doing. (This is also the reason I don't sketch in black) You can do this by clicking on the word Transparency. When you do this should appear;


You can then click on the drop down menu where it says 100%, and select your choice of opacity. I use around 40% but if you feel more comfortable having a different level then you should choose what you work with easiest.

The next part we will be using the same menu. Underneath where we changed the opacity you should see something that says Layers. Click on this to make sure you can see the layers panel. 


It's always a good idea to keep each type of drawing on a separate layer. It avoids complications and confusion, and it's easier to keep track of what you are doing. To do this, we need to make a new layer - the current layer has our sketch on it. There are a few symbols at the bottom on the layer panel, one looks like a magnifying glass, one looks like a bin, etc. We need to click on the one that looks like this;


This will create a new layer.

You can rename your new layer if you like; I never do but that's because I am lazy. You just double click on the text of the new layer that has now appeared and it will allow you to type a new name.

You need to lock the old layer (with your sketch on) so you don't accidentally use the wrong layer. So locate and click once on the original layer which will be named Layer 1 or Layer 0, then click in the blank box next to the box with the eye symbol. A lock should now appear in that box. (If you can't find anything I mention, just hover over where you think it is and AI will pop a little message up telling you what you are hovering over.) If you lock the wrong layer, just click the lock again to unlock.

You will be working in the new, blank layer (Layer 2 unless you renamed it) so click on it once to let the program know you're working in this layer.  Finally you should end up with your sketch like this;


Now you're ready to start making a vector!


Drawing with the pen tool

To the left of your page is the Tool bar. Some versions may have this in a different place but it holds these icons;


I won't explain them all now, but the most important in this case is the first black arrow, which is your selection tool. Whenever you want to move or select anything use this. The second one we need is the Pen tool. It's the one that looks like the nib of a pen. (Clever!)


Click on this to tell the program you are using it.

I would note at this point you should be periodically saving your document. I have got into the habit of obsessively saving, but don't leave it until you are finished because if your computer crashes or the program is closed you will lose all your work and there is nothing more frustrating. To save, just click on File again on the top menu bar, and then Save... A window will appear asking you for some self explanatory info which you should fill in.

The pen tool takes some mastering... the best way to master it is just to play around with it. You will get frustrated and annoyed, but if you're serious about learning vector you'll keep going and eventually get to grips. The basic principle is;

Click once on your piece of paper to start the line from your pen.
Click somewhere else
Now your pen tool will 'connect the dots' to make a line, simple!


To make a curved line, click once to start the line, then when you click again, hold down your click and 'curve' or move your mouse. This will create a curved line. 

You can keep clicking to keep your line going. Select the selection tool in the tool menu (the black arrow) to stop using the pen.

If you lose your place you can click on the last point of the line and keep it going.

Nothing I say will really help you here, you just have to practice. You can use some of the other tools which some people find easier - try them and see! Let me know if you found or know something that works better for you.

Eventually after minutes, hours or days depending on how easy you found it, you will end up with the line work for your illustration. Well done!


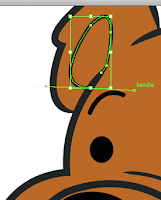
The lines you create can be changed at any time to suit your drawing. For example in this one I changed certain lines to have tapered ends, and some to be thinner than others. You can do this by the tools on the right side that look like this;


Your brushes are your line styles.

If you can't find a line style you like, click on the tiny picture which looks like this;


and browse the different styles available. Bear in mind if this is your first time it's good to stick to basic.

To change the width, click on Stroke, as shown above. Then adjust the weight of the line. You can use this in minus points as well if 1pt is too thick. I often use 0.5 or even less. 

Sometimes you might want to add a solid shape to your lines, such as the nose on the bear I am drawing. This can be done in 2 ways - either make your shape with the pen tool and 'switch' the fill from outline to inner fill by using this little tool at the bottom on the tool bar;


(Just click on the reversible arrow and see what happens.) 
Or you can create a shape using the Shape tool. The shape tool may look like this in your tool panel;


Or it may look like a circle, or star - whatever was used last. If you click and hold down, you can select from a list of shapes, the choice isn't great. To draw the shape just click on your paper, hold down and drag. You may have to adjust the shape with the selection tool to get it right.


If you want to delete a line just use the selection tool to select it, and then hit the delete button on your computer to delete.

If you want to delete a fill but keep the line (or vice versa) just click on the box with the red cross in it.


So now, in your layers panel, find the layer which holds your sketch and click on the eye - the layer should turn invisible and you can see your line work alone.


Hurrah! You can click the same place again to turn the sketch layer on again


Colouring in with the pen tool

Create another new layer (remember how?) and lock the old layer which now has your line work on it. Make sure your line work layer is ABOVE the new layer - you may have to click and drag the layers into order.

Save! Always save!

On this new layer, select the pen tool again.

This time, you will be creating shapes to be the colour. This is done in the same way, drawing the shape with the pen tool like we have been doing, it's easy to follow your line work now rather than your sketch.


But instead of a line, we want a solid colour. It is the same as I explained above for the nose. Just go to the tool bar and 'switch' the outer line fill to an inner fill by use of the reversible arrow. When you do this you'll see a mess of a shape if you haven't finished your shape yet. 


If you have finished it will probably be black as we were working with black lines. To change the colour, at the bottom of the tool bar, double click the black box that represents your fill. It's the 2 overlapped boxes at the very bottom of your tool bar.
This window will appear;


Select the colour you want, and click ok. 

Now your shape has colour!

Continue until all your shapes and colours look right.


Each new shape you create will be on the top of the last, so best to work bottom up.


Finishing your art

Your illustrations should now look pretty finished. You can leave it here if you're happy, or you can add some finishing touches to create some depth. I do this by creating a new layer on top of everything, and creating some shapes that will represent shadows and highlights. I do this again, with the pen tool.


I create a solid black shape, then turn the opacity of the shape down to 10 or 20 %

I add some solid white shapes for highlights and I'm done!


Save, save and save again!

Your picture is done!

This was my first time writing a tutorial, so I'd love some feedback. If you think I missed something or I wasn't clear enough please let me know!

Most of all, if you made a vector image using this method PLEASE let me know as I'd love to see it and I can share it on my blog! 

Next week I will write a tutorial about creating an illustration in Adobe Photoshop, a totally different outcome!
 Please subscribe at the top of this page to follow me, I leave you with my Project 365 for this week.


Sunday 10th March

Monday 11th March

Tuesday 12th March

Wednesday 13th March

Thursday 14th March


Friday 15th March


Saturday 16th March

Thanks for reading! See you next week ;)


Saturday 9 March 2013

Apples and Oranges!

This year I decided to commit myself to a PROJECT 365. For each day of the year 2013, I will do some sort of illustration, doodle or cartoon and upload it to my blog. You can see what I've been doing so far by checking out the past posts.

To start with, here is Monday 4th March 2013;

This little guy is the main character in a book aimed at young children.

I chose a vector style of artwork for a bold, clean look - and messed it up with some rough, sketchy brushes and textures to appeal to young kids!

I took snapshots of the process so you can see how I created him, first starting with the blank page in Adobe Illustrator;


Then... adding the rough sketch of the character which I had previously created in Photoshop...


I used the sketch as a base and created the lines over the top...


The base keeps me on track, but as you can see it's not completely true to the original sketch. Here it is without the base layer;


Next, I added the block colour;


Almost done! Now just to add some texture to his T-shirt and hair, and straighten any bits I forgot, remove the base and...


There he is! 

Do you want to know how to create vector illustrations in Adobe Illustrator? Check back next week when I'll be doing an in-depth, step-by-step guide with pictures!

And here are the rest of this week's project 365, enjoy!

Tuesday 5th March 2013


Wednesday 6th March 2013


Thursday 7th March 2013


Friday 8th March 2013

Saturday 9th March 2013


Thanks for looking! 

As always feel free to comment, and subscribe!

Sunday 3 March 2013

Wall of Work!

I'm back!

Sorry I have not been posting for a while... I have been on holiday!  Project 365 doesn't take holidays... And for that reason I still have an illustrations for every day since my last post, even though a large number of them are 10 second doodles!

I decided to post up my Project 365 illustrations in one big wall, known as the Wall of Work!! This covers until Sunday the 3rd of March! 
Thanks for looking!


Now that I'm back to work, I will make a point of updating this blog ONCE A WEEK with news, Project 365 and articles I think people might like. Is there anything particular you'd like to see? Let me know!

Bye!


Friday 1 February 2013

Project 365... an illustration a day

Here is an update for Project 365, which I have been doing since the start of this year. It features at least one illustration, for each day of the year. So here is 26th Jan 2013...


It's been a long wait but the Alley Girls book is now in progress! You might remember that I posted some rough designs for these characters some time ago. Here is one of the new characters fully coloured!


And here is a sneaky peek at my designs for different eye shapes for the girls. Can you guess who is who?


This cool dude was a commission I finished on 27th Jan 2013.... He was quickly sketched out some time ago and featured as one of my daily illustrations, do you remember? He's now been finished in Adobe Illustrator!


28th Jan 2013... The next illustration is a simple vector graphic for a client. It too was created in Illustrator.


And yet another vector illustration for a client on this day too! 29th Jan 2013.

While drawing this image I was forced to look at the way I sit at a computer and my posture, I must say I look very similar to the guy below, except I don't wear a tie!


30th Jan 2013...


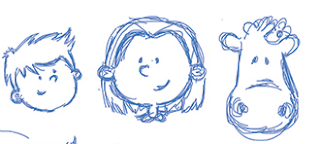
These 3 faces are quick sketches of some new characters for a client. Hopefully you'll be seeing more of these in the future!

31st Jan 2013...


And here is the first chapter illustrations for ST VIPERS SCHOOL FOR SUPER VILLAINS - due for release later this year. You can head on over to The Viper's blog here to keep up to date with the book's progress!

Here is the illustration for the 1st of Feb, 2012. It is a snapshot from a bigger picture...


And as for today, 2nd Feb 2013, I'm pleased to announce that Timmy's book was finally finished! Here is one page for you, but I will be sure to let you know when the book is out for sale so you can see the rest!


Also a big HAPPY BIRTHDAY to my nephew who is 3 today. 

Thanks for looking!


Thursday 31 January 2013

The reality check - 10 influential artists, who are better than me!

I pour my heart and soul into the work I do. I spend hours alone, sometimes passing on going out with friends or family to stay in and work instead. So when I see other artist's work, which is (seemingly) effortlessly a million times better than mine, it's easy to be disheartened. 

However I've learned over the years to turn that feeling into motivation. Rather then give up because I will never be as good as them, I am determined to learn from them and to keep drawing until one day I can be up there with the best... I still have some way to go!

So in no particular order, here are my top ten artists that influence me. 
I must state that this is not a list of the best artists of all time, although in my opinion some of them just might be, this is more of a personal list to show you a selection of artists who mean a lot to me and have helped me morph into the illustrator I am today. Hopefully you will find someone on this list who will inspire you too!


JAMIE HEWLETT

Jamie Hewlett
There was no hesitation to putting Jamie Hewlett here. One of the first artists to really hit me hard, and one of the biggest influences for picking up a pencil. It all started when I bought a copy of Deadline in the early 90's. Inside was a young Punk who drove a tank and had a mutant kangaroo for a boyfriend. I was hooked!

Jamie Hewlett was influenced by another great artist who I love, Brendan McCarthy, but for the sake of this list, I'll be missing Brendan out, sorry! However I would advise anyone reading to go and check out his work on Rogan Gosh.


Jamie Hewlett's 'Tank Girl'
English artist Hewlett works close with bands and has done commissions for Pulp, Mindless Self Indulgence and more. He is the co-creator of the animated band Gorillaz alongside Damon Albarn, and created costumes and animation sequences for Monkey: A Journey to the West. However in my eyes his greatest creation will always be Tank Girl.

Work to check out; Tank Girl, Gorillaz, Hewligan's Haircut, Phoo Action

Website; www.jamiehewlett.com


RENE MAGRITTE


I found Magritte through researching Salvador Dali, and although both are Surrealists, Magritte got deeper into my skin then Dali ever did and so he beats Dali to be on this list.


Rene Francois Ghislain Magritte was a Belgian surrealist artist. If you are not familiar with Surrealism, it is an philosophical art movement that started in the 1920's, and featured works that challenged the audience's perception of reality. What I liked most about the work of Surrealism, is that it made me think, it is thought provoking and encourages you to question not just the art, but life too.

 Magritte's work does just this. Perhaps his most famous work is "Ceci n'est pas une pipe" - which translates into; 'This is not a pipe.' The painting does seem to contradict this, but of course it is not a pipe, it is a painting of a pipe. 


Work to check out; Young Girl Eating a Bird, The Human Condition, The Eternally Obvious, The Good Omens, The Tiredness of Life

CHRIS RIDDELL


I discovered Chris while reading Paul Stewart's 'The Edge Chronicles', series, which Chris illustrated beautifully. His scratchy, detailed style and the way he depicted the characters with such emotion and style inspired me to do the same with my own art. 


A British illustrator born in South Africa, Chris Riddell is also a political cartoonist for The Observer, and occasionally writes his own books too. Possibly my favourite thing about Chris is the way he draws the human form.

Work to check out; Beyond the Deepwoods, Stormchaser, Beowulf and the Monster, Dakota of the White 

Website; www.chrisriddell.co.uk


COOP


I don't remember exactly how I found Coop, but his work is everywhere in my life, and most likely yours too.


Coop is commercially successful; hotrods, t-shirts and clothing, stickers, skate boards, toys, lighters, posters; the list is endless. 
American born Chris Cooper, aka Coop, skipped art school and went straight to fame. I noticed him mostly after seeing his band posters for the likes of Nirvana, Soundgarden, the Sex Pistols as well as album cover art for the Ramones and so on. Even his pop-art feel pin ups featuring devils, monsters, aliens can't be overlooked. It is bright, bold and a little bit naughty. What is not to love? 
One which is best not to show the kids or your Gran, but definitely one to show everybody else!


Work to check out; Coop's devils, Vans footwear, skateboards, posters,


JOSH KIRBY


It was awfully difficult to narrow this list down to just ten people, but Josh Kirby is definitely deserving of a place. I love to read, and Terry Pratchett's 'Discworld' novels were a favourite of mine as a child. Kirby seemed to capture the complete essence of the book in a single illustration.


Born Ronald William Kirby on the outskirts of Liverpool, England, he worked mostly in Oils, and his unique style and detailed paintings are mystical, fantastical and instantly recognisable. He died at the age of 72 and the Discworld artwork was taken over by Paul Kidby, who does a great job.


Work to check out; Discworld, Monty Python's Life of Brian, Star Wars

Website; www.joshkirbyart.com

JIM LEE


This really was a tough one. I had several comic artists on my list but still wanted more. Ed Benes and Frank Quitely both very nearly made it, but in the end I chose Mr Lee.


Korean born, American raised comic book artist Jim Lee's work speaks for itself. He has worked on X-men, Batman, Superman and more. Chances are if you're a fan of comics, you're a fan of Jim Lee. Jim made it on this list because he has contributed so much to the comic world, not just his fantastic art, but also editing, publishing and he now stands as Co Publisher of DC Entertainment. His work is incredibly detailed, striking, and world famous - rightly so!

For those who know me, it is one of Jim Lee's Batman illustrations that I have tattooed onto my shoulder.


Work to check out; Batman: Hush, Deathblow: Sinners and Saints, Gen 13, Superman, Justice League

Website; www.dccomics.com


HAJIME SORAYAMA


Have you ever seen one of those illustrations, that at first glance looks like a photograph? That's Sorayama's game. 


Famous for his realistic pin-ups, Japanese illustrator Hajime Sorayama paints with such fine detail it is mind blowing. If like me, you love robots, then his beautiful feminine robotic women complete with chrome finish, with take your breath away. Aerosmith's 'Just Push Play' album features one of his best. Who is ready to be impressed?


Work to check out; Sony, George Lucas, Playboy, Disney

Website; www.hajimesorayama.com (Contains artistic nudity)


QUENTIN BLAKE


I'm sure everybody reading this has read one of Roald Dahl's books, and I'm equally as sure that if you did, you enjoyed looking at the accompanying illustrations.


Sir Quentin Saxby Blake is an English illustrator, best known for his fun and quirky illustrations in the Roald Dahl books. He has contributed to over 300 books, 35 of which he has written himself! I could list numerous children's book illustrators, but Mr Blake makes it here because his work takes me back to my childhood, reading under the quilt with a torch late into the night. 
Fantastic Mr Fox, The BFG, George's marvellous medicine, The Twits and all the others will be with me forever, and that's partly thanks to the pictures drawn by Quentin Blake.


Work to check out;Books by Roald Dahl, David Walliams, Dr Seuss


H. R. GIGER


Hans Rudolf Giger is a Swiss Surrealist painter, sculptor and set designer. He works mostly in airbrush, and creates the most bizarre, dreamlike (or should that be nightmarish?) concoctions that would make even Chris Cooper blush. 


Another one with an adult only warning I'm afraid, but he just couldn't be left off the list. Rather than attempt to describe his strange, yet fantastic work, it is best if you just go and take a look for yourself, making sure your boss is not looking over your shoulder while you do!
 Giger has admitted he suffers from 'night terrors' and his work can be attributed to the influences of the sleep disorder.

Work to check out; Alien (1979) Giger Bar, Necronomicon

Website; www.hrgiger.com

JUDD WINICK


While temporarily working in a call centre when I was sixteen, my boss handed me his copy of Barry Ween: Boy Genius to read. I never did get to thank him properly for the massive effect this had on me, for this was one of THE BEST comics I have ever read, and still re-read to this day.


Judd Winick was born in New York and was originally famous for being on a reality TV show called 'The Real World.' I didn't see this, but his artwork is fun, captivating and features lot's of apes / monkeys so it's a winner in my book! 

Perhaps what really sells Judd's work is his fantastic writing, I wouldn't recommend you give Barry Ween to your children though, I did warn you. Judd has moved to the big league and now writes and creates artwork for a plethora of DC comics, including Batwing and Catwoman.


Work to check out; The Life and Times of Juniper Lee, Barry Ween: Boy Genius, Pedro and Me, Frumpy the Clown

Website; www.juddwinick.com


That's it! These are just people who have somewhat helped me to do what I do today, but I am constantly discovering artists new and old. If you think I've made a huge mistake and overlooked someone incredible, please make a point of telling me. Thanks!

Coming soon... more project 365...