Saturday 2 November 2013

EVERGREEN CREATIONS BOOKS; Thankyou to family farmers everywhere!

I've been illustrating for Aaron Burakoff for a while now, and every time he sends me a new script, I can't wait to see what fun illustrations I'll get to draw this time!

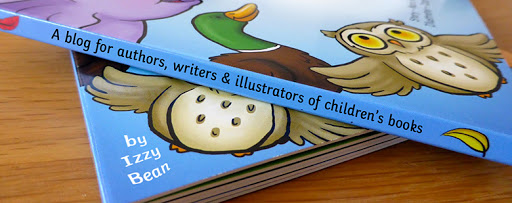
Aaron sent me some of the printed books (Written by Aaron Burakoff, illustrated by Izzy Bean) for the Fairy Tale Trail recently, and I just couldn't wait to show you all! Don't they look great?


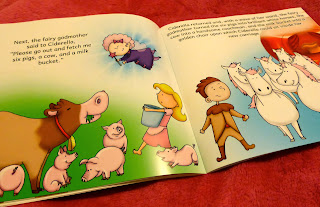
The Fairy Tale Trail is a series of timeless fairy tales you know and love adapted to the agri-tourism industry to help teach children about farming in a fun way!

Each story features a different food and takes you on a magical journey to help understand where this food comes from and how it's made. 

There's important life lessons for kids, but also supports farmers and similar family-friendly venues.


The books are 10" by 10" - making them easy to read, hold and look at. They feel great, and the bright, bold colours are superb for getting the message across!


The books are available to buy over at the official Fairy Tale Trail website right here;


Or you can get them as ebooks too! 


And that's not all! The Fairy Tale Trail website features lots of activities for kids too, including colouring in sheets, word searches and more! Check it out here.


What's great about these stories is they can be applied to activities such as mazes and walk-throughs too - here's a few shots of the spreads up in the Corn Mazes, have you been yet?


Lacombe Corn maze sign
The Fairy Tale Trail is packed full of fun with a really important message about healthy eating, where our food comes from and more - be sure to follow their website for updates and more stories!


Thanks for reading, I can't wait for the next instalment, can you?


Friday 25 October 2013

Step by Step HALLOWEEN DRACULA VAMPIRE MONSTER! With Free colouring sheet for kids!

I've been posting these halloween guides all week, and today it's the turn of DRACULA!

All you need is a pen and paper - or a computer and mouse. It's not too difficult and it's easy to personalise if you want to be creative too!

And there's a FREE downloadable colouring sheet for kids at the bottom of this post!

DRAWING DRACULA - STEP BY STEP GUIDE

To start with, make a shape like this;

And another one, exactly opposite. They want to be as near symmetrical as possible, and the same size!

Then, draw this strange shape. This is the most difficult part, I promise!


And as before, draw it's mirror image opposite. All these shapes should connect and create one shape - the face!


Next, add this line and curve as above. Try to end it about 1/5th of the way down from the top, and in the centre of the face.


Do the same on the other side, making sure they meet in the middle!


Now we'll be adding ears. You can draw any shape ears you like, pointy ones work very well for Dracula. It's good to keep them symmetrical.


His nose, again, can be customised to create your own look, but pointy, long and thin are always a winner.


Next, we add the eyebrows. Have them meet in the middle, but not touching - you can leave a little gap. Arch them high in the middle for that menacing, evil effect!


At either side of the nose, draw small curves like this...


... then connect them with a menacing smile!


Add a little curve under that smile to give him a bottom lip!


Next, draw a long line downwards from the chin, and flick it outwards at the end.


Do the same on the other side too


Then, find where the very bottom of the nose is, and starting from the cheek besides it, draw a long curve, stopping at about the same length as his chin.


From this curve, draw another curve (not quite so curvy!) inwards, but stop before you get to his neck!

Apply the same to the other side, and you're nearly there!


Add two little beady eyes underneath those eyebrows you drew earlier. 


Now we can add some details to the inside of the ears... but wait! 
We're forgetting the most important bit!!


The fangs! Draw these nice and big, with sharp points on the end! 
He wouldn't be Dracula without them.


And there you have it! A sinister vampire cartoon of your very own!

Add some colour and share him with the world! Or me... at izzybeanillustrations@gmail.com


And as promised, here is a downloadable colouring in sheet for the kids, little and big! Just right click on this massive image below, 'SAVE AS' then print onto A4 paper.

See you next time!


Tuesday 22 October 2013

Step by Step HALLOWEEN FRANKENSTEIN MONSTER! With Free colouring sheet for kids!

Yesterday I posted a step by step guide to drawing your very own halloween bat, today, it's Frankenstein's monster!

If you missed the bat, you can find that here.

All you need is a pen and paper - or a computer and mouse. It's not too difficult and it's easy to personalise if you want to be creative too!

And for a FREE colouring sheet, scroll to the bottom of this post! (If you can afford to miss the drawing guide!)

DRAWING A FRANKENSTEIN'S MONSTER - STEP BY STEP GUIDE

We begin with this shape;

It's not exactly a curve, nor is it square; but somewhere in-between. 

Next, the same shape, but upside down!

Make sure they're touching and the bottom one fits into the top.


At the point where these shapes cross, draw some bent circles peeking out. These will be the ears - so if you want big ears, make them bigger! I went for little ears.


Next add two lines coming from the very bottom of those ears. The lines should not be straight down, but widen outwards.


In the dead-center, between the ears, add a nose! I drew two small dots, then a circle connecting them. Leave out the bottom of the circle.

To add a chin, draw a semi-circle over the bottom of the face. You should erase the bottom of the face so that it looks like the picture above.

Now draw a ( bracket shape on the left of the face, and a ) bracket shape on the right.

Connect these brackets with a curve - and you have a smile!

An extra, smaller curve under the smile gives him a bottom lip.


Now for the hair - here you can use your imagination and make it as long, curly, spiky or wavy as you like!

We want an L shape on it's side to make the monster's spooky forehead


And the opposite on the other side - it's good to keep faces symmetrical!


Above each L shape you just drew, draw some eyebrows - these are slightly arched


Let's get up close and add some eyes! Two little dots right above the nostrils look great - but you can play around with placement and see what looks best!


We're getting close! But there are still some important things to add yet!

Draw a small 3 in the left ear (your left, not his!) and a E in the right ear.


Halfway down his neck, underneath his ears, draw a small rectangle like this...


... and then join that to the neck with two lines like this!


Once you do that on both sides... ta daa! Your monster is complete! Mary Shelley would be proud!

Add some colour, and share your creation with the world!


Thanks for reading, don't forget to watch this blog for more halloween how-tos all this week until the 31st!

As promised, below is the FREE colouring sheet for any little monsters who like to get messy this halloween. Simply right click the huge picture and 'SAVE AS' on your computer, then print the picture onto A4 paper!

And if you would like to share your monster, just email a picture to izzybeanillustrations@gmail.com

See you next time!